
LAST UPDATED: 15th January 2023 by The Editorial Team

Summary: Step by step guide and video showing how to wire a one-way light switch and a two way light switch.
Contents
How to wire a light switch
* Notifiable project requiring Building Control approval
Two-way switches allow you to operate lights from either switch and are frequently found in hallways and landings. To install two-way switching you will need to replace the existing switch and run three-core-and-earth cable to where the new switch is to be located and fit another two-way switch. In this project we are looking at fitting two-way switching on two floors.

Wiring a two way switch
- Turn off the mains supply. Alternatively, remove the appropriate fuse for the circuit or switch off the MCB at the consumer unit.
- Unscrew and carefully remove the face-plate of the existing switch from its mounting box.
- The existing switch will be connected to two-core-and-earth cable. However, it is important to remember that since March 2006 the colour codes of cable cores have changed and you must be aware of this when connecting pre-2006 cores to terminal with cable purchased since the new colour codes came into effect. For assistance see below.
- Disconnect the cores from the terminals on the face-plate and the earth core from its terminal in the mounting box. If the cable does not have an earth core then you must only use plastic switches and mounting boxes.
- Plan your cable route from the location of the new switch to the existing one.
- Following the instructions in the project Preparing a cable route; cut a housing for the new mounting box and a chase in the wall for the cable. The chase should run from the housing up the wall. Then through the ceiling, along the space above the ceiling to a position directly above the existing switch.
- With a cable detector locate the position of the two-core-earth cable in the wall that runs to the existing switch.
- Carefully widen the chase running from the existing switch to the ceiling ensuring you don’t damage the cable.
- At the location of the new switch, feed the three-core-and-earth cable into a protective oval conduit cut to the length that corresponds to the measurement from the top of the mounting box to the ceiling.
- Secure the conduit in position by driving a number of galvanised nails into the masonry on either side of it.
- The three-core-and earth cable can now be fed from the location of the new switch to the existing one.
- The original cable can now be pulled from the mounting box and out of the widened chase.
- Cut another length of oval conduit that corresponds to the distance between the top of the mounting box and the ceiling.
- First feed the original two-core cable into the conduit. Then feed the three-core-and-earth cable into the conduit.
- Feed both cables through the hole in the top of the mounting box, ensuring there is enough cable for the cores to reach the switch face-plate.
- Secure the conduit in the chase with galvanised masonry nails.
Two-core-and-earth cable
Before 2006
- Black – Neutral
- Red – Live
- Bare – Earth
After 2006
- Blue – Neutral
- Brown – Live
- Bare – Earth
Three-core-and-earth cable
Before 2006
- Blue *
- Red *
- Yellow *
- Bare – Earth
* One or more of these cores could be live.
After 2006
- Grey *
- Black *
- Brown *
- Bare – Earth
* One or more of these cores could be live.

Connecting the switches
- At the original switch straighten the ends of the cores from the existing two-core-and-earth cable with pliers.
- Strip the outer sheath from the end of the three-core-and-earth cable.
- Strip about 15mm of insulation from the ends of the grey, black and brown cores and twist the cores with pliers.
- If the earth cores of both cables are bare, cover them with a green-and-yellow insulation leaving 15mm of core exposed. Twist the ends with pliers.
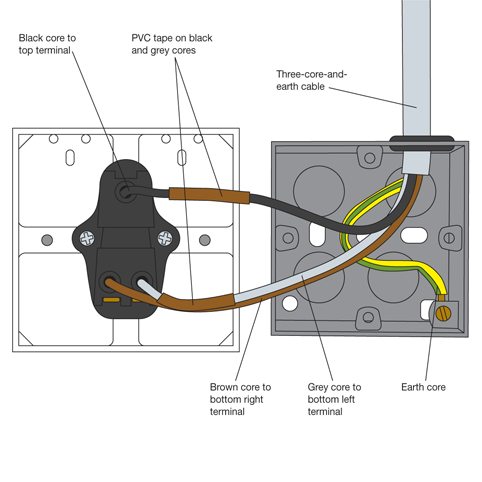
- Connect the live core from the original cable (red or brown) and the browncore from the new three-core-and-earth cable to terminal L1 on the face-plate of the new switch.
- Connect the neutral core from the original cable (black or blue) and the grey core from the new cable to terminal L2 on the face-plate. Before making these connections the cores connected to L1 and L2 that don’t have brown insulation must have brown PVC tape wrapped around them to indicate they are Live.
- Connect the black core from the new three-core-and-earth cable to the top terminal marked COM.
- If you have a metal mounting box, the green-and-yellow core from both cables should be attached to the earth terminal in the mounting box. If the face-plate of the new switch is metal a flying earth should be connected between the Earth terminals in the mounting box and on the new face-plate. With plastic mounting boxes the earth cores should be placed in a plastic terminal block.
- With all the cores connected screw the face-plate onto the mounting box.
- Return to the location of the new switch and connect the brown core to terminal L1 on the faceplate.
- Wrap brown PVC tape around the grey core and connect it to terminal L2.
- Connect the black core to the terminal marked COM.
- Connect the green-and-yellow core to Earth terminal in the mounting box. As for the first switch, if the face-plate of the new switch is metal a flying earth should be connected between the Earth terminals in the mounting box and on the new face-plate. With plastic mounting boxes the earth cores should be placed in a plastic strip connector.
- Screw the face-plate to the mounting box.
- Re-plaster around the switches and over the chases.
- Restore the mains power or replace the fuse or switch on the MCB and check the switches are working properly.

Tools needed
- Insulated screwdriver
- Cable detector
- Power drill
- Masonry bit
- Brick bolster
- Club hammer
- Trimming knife
- Wire cutters/strippers
- Hammer
- Pliers
Materials needed
- Three-core-and-earth cable
- PVC oval conduit
- Galvanised nails
- Yellow-and-green sheathing
- Brown PVC tape
- Plastic strip connector
Important note
The colour-coding system for electric cable changed in 2006, make sure you read Electric cable and flex to view the new information.
How to wire a one way light switch video
How to wire a two way light switch video
Author
Related projects
- Using a continuity tester
- Wiring a dimmer switch
- Wiring a wall light
- Wiring a plug
- Wiring a telephone extension
- Wiring ceiling lights
- Wiring electrical circuits
- Wiring low voltage spotlights