

Summary: Learn how to lay carpet, fit carpet with integral underlay and fit a carpet with a separate underlay.
There are two types of carpet: carpet with an integral rubber or foam-backed underlay and carpet that requires a separate underlay. Remember that good quality carpet is expensive and any mistakes can be extremely costly. The fee charged by a professional carpet fitter will be far less than the cost of replacing a new carpet ruined by poor cutting. However, there is no reason why you should not attempt laying carpet in small rooms or laying second hand carpet that has already been stretched.
Useful hints
- When ordering carpet, allow an extra 100mm-150mm in each direction to allow it to be cut to the exact size.
- It is a good idea to practice your carpet cutting technique on off-cuts or a piece of old carpet before you install the new carpet.


Fitting carpet with integral underlay
- Cover the floor with a paper underlay. This will protect the carpet from any dirt blown up from between the boards and will stop rubber or foam-backed carpets sticking to the floor. A gap of around 50mm should be left around the perimeter of the room to allow you to stick double-sided carpet tape to the floor.
- Start laying the paper in the corner of the room. Unroll about a metre of paper and staple it to the floor with a staple gun. The paper underlay can also be fixed in position using double-sided tape.
- With a metre of paper underlay in place, unroll the paper to the end of the room, smoothing it flat to the floor and staple it to the floor. Trim the end, remembering to leave a gap for the double-sided carpet tape.
- Roll out another length of paper next to the first, overlapping the edges by 25mm. Continue across the room until the whole floor is covered.
- Stick down double-sided carpet tape around the perimeter, but do not remove the backing paper.
- Lay the carpet in the room. The pile should run away from any windows. By running your hand over the carpet you can tell in which direction the pile runs. If the surface of the carpet feels smooth when your hand is moving away from the window then the pile is running in the right direct. If the carpet has a pattern ensure it looks square from the doorway.
- The edges of the carpet should overlap the walls. To get the carpet to lay flat in the corners of the room make small verticals at the corner of the carpet.
- Form a crease in the carpet where the bottom of the skirting board meets the floor. Then carefully cut away the excess with a trimming knife or craft knife. To ensure you cut the carpet at the base of the skirting board, hold the knife at a 45° angle away from the wall with its blade at the junction between the skirting and floor.
- Pull back the edge of carpet and remove the backing paper from the double-sided tape.
- Push the carpet back in place and stick it to the floor.
- If the room requires you to join separate lengths of carpet, ensure any pattern is matched across the join.
- Run a strip of double-sided carpet tape across the floor so that the adjoining edges of both pieces of carpet are centred over it.
- Remove the backing paper from the tape and firmly press the carpet down smoothing out any creases.


Fitting a carpet with a separate underlay
If you are laying a carpet that requires a separate underlay you will need to fix gripper rods around the perimeter of the room. Gripper rods normally come in 1.5m lengths.
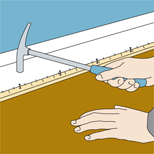
- Nail the gripper rods around the perimeter of the room with the teeth pointing towards the wall. The gripper rods should be positioned so there is a gap between the skirting board and the rod just slightly less than the thickness of the carpet. To prevent damaging the teeth on the gripper rods use a carpet fitter’s hammer or start with a claw hammer then drive the nails home with a nail punch. If you have a concrete floor use masonry nails or a suitable adhesive.
- If there are radiator pipes in the way, place the gripper rod as close to the wall as you can.
- On reaching a corner cut the gripper rod to size with a junior hacksaw and then butt another length against it to follow the line of the adjacent wall.
- If your room has a curved area e.g. a bay widow, then cut the rods into shorter lengths and follow the curve. Similarly with doorframes, cut small lengths of rod and fix them around the base of the doorframe.
- A threshold strip should be fitted in every doorway. These are metal strips that can be cut to size and nailed or screwed to the floor. They hold the carpet down.
- Unroll just a couple of metres of underlay in the corner of the room, positioning it so that its top edge and side are against the gripper rods.
- Staple the underlay to the floor using a staple gun or fix to the floor with tacks. With a concrete floor use double-sided tape to fix the underlay to the floor.
- Unroll the underlay across the room keeping its edge against the gripper rod. Smooth it out flat and fix it to the floor along both edges.
- On reaching any radiator pipes lay the underlay up to the edge of the gripper rod.
- On reaching the opposite wall trim the underlay with a trimming knife so it fits against the edge of the gripper rod.
Tools needed
- Staple gun
- Trimming knife OR craft knife
Materials needed
- Paper underlay
- Double-sided carpet tape

Laying the carpet
- Lay out the cut carpet in the room with its edges overlapping slightly up the walls.
- Cut off any excess carpet around obstacles such as a chimney-breast. Make sure the carpet is laid out squarely in the room.
- To get the carpet to lie flat in the corners of the room, press the carpet into the corner and make a vertical cut with a trimming knife.
- Form a crease in the carpet where the bottom of the skirting board meets the floor. Then carefully cut away the excess with a trimming knife or craft knife. To ensure you cut the carpet at the base of the skirting board, hold the knife at a 45° angle away from the wall with its blade at the junction between the skirting and floor.
- In one corner of the room secure the edge of the carpet to the gripper rods by engaging the carpet with the teeth.
- Now stretch the carpet out along one of the adjacent walls, using a knee-kicker carpet stretcher. To do this, insert the teeth on the stretcher into the carpet as close to the corner as possible and ram your knee hard into the padded end of the stretcher.
- Work along the wall until you reach to the adjacent corner. Secure the carpet on the gripper rods.
- Return to the first corner and stretch the carpet along the other adjacent wall in the same way. On reaching the corner secure the edge of the carpet to the gripper rods.
- Once again return to the first corner and stretch the carpet diagonally across the room to the opposite corner. Secure the carpet to the gripper rods in this corner.
- Turn at right angles to the diagonal you have been working along and repeat the stretching operation in the other direction.
- As the carpet has been stretched it may be necessary to trim the edges again, but leave an excess of 10mm all around the room.
- Push the excess down between the gripper rod and the skirting board with a carpet bolster.
- Finally, secure the edge of the carpet in the doorway/s with a threshold strip and carefully knock down the cover of the threshold strip with a hammer. To prevent denting the metal threshold strip protect it with an off-cut of wood.
Tools needed
- Carpet fitter’s hammer
- Claw hammer
- Staple gun
- Nail punch
- Junior hacksaw
- Knee-kicker carpet stretcher
- Carpet bolster
Materials needed
- Gripper rods
- Threshold strip
- Nails OR screws
- Tacks OR double-sided carpet tape for concrete floors