• Home
  • DIY
    • Self build
    • Projects and advice
      • Bathroom
      • Building, brickwork and masonry
      • Ceilings
      • Cleaning
      • Concrete work
      • Damp, rot and infestation
      • Drains
      • Electrical
      • Fireplaces
      • Floors
      • Garden
      • Heating
      • Insulation
      • Kitchen
      • Lighting
      • Lofts
      • Painting and decorating
      • Plasterwork
      • Plumbing
      • Roof and guttering
      • Safety
      • Security
      • Tiling
      • Walls
      • Windows
      • Woodwork
    • Glossary
    • Know your tools
    • Know your materials
  • Cost guides
  • News
  • Community
Facebook Twitter Instagram
lets-do-diy.com
  • Home
  • DIY
    • Self build
    • Projects and advice
      • Bathroom
      • Building, brickwork and masonry
      • Ceilings
      • Cleaning
      • Concrete work
      • Damp, rot and infestation
      • Drains
      • Electrical
      • Fireplaces
      • Floors
      • Garden
      • Heating
      • Insulation
      • Kitchen
      • Lighting
      • Lofts
      • Painting and decorating
      • Plasterwork
      • Plumbing
      • Roof and guttering
      • Safety
      • Security
      • Tiling
      • Walls
      • Windows
      • Woodwork
    • Glossary
    • Know your tools
    • Know your materials
  • Cost guides
  • News
  • Community
lets-do-diy.com
You are at:Home»Projects and advice»Fitting and wiring an electric shower

Fitting and wiring an electric shower

LAST UPDATED: 3rd January 2023 by The Editorial Team

Fitting and wiring an electric shower

Summary: Step by step guide and video showing how to fit, install and wire an electric shower.

Contents

  • Fitting and wiring an electric shower
    • Preparation
    • Installing the ceiling pull-switch
    • Connecting to the heater
    • Completing the circuit at the consumer unit
    • Tools needed
    • Materials needed
  • How to change/replace an electric shower video

    Fitting and wiring an electric shower

    *Notifiable project requiring Building Control approval. Installation must conform to Electrical Regulations.

    An electric shower is supplied as a wall unit and uses an electric element to heat the water. The unit is plumbed into the cold water supply and is run on a separate circuit to avoid overloading the main circuit. Installation may vary for different shower models so read the manufacturer’s instructions carefully.


    Fitting and wiring an electric shower diagram
    Connections. at the shower heater unit

    Preparation

    Before commencing on the electrical work, install the shower cubicle and tray, and carry out all necessary plumbing work, following the manufacturer’s instructions and the guidelines in Installing a shower.

    • Turn off the power to any circuits in the vicinity of the installation at the consumer unit.
    • Ensure all metal pipes and fixtures are properly earthed.
    • Measure the distance between the consumer unit and shower heater to work out how much cable you will need. If the cable route is under 13m and the shower is rated up to 8kW, use 6mm2 cable and a 45amp rewireable fuse. If the cable route is over 13m or the shower is rated up to 10kW, use 10mm2 cable and a 45amp cartridge fuse of MCB. If the route is over 20m, use 16mm2 cable and a 45amp cartridge fuse of MCB.
    • Remove the coverplate of the shower heater and hold it against the wall to mark the position of the fixing holes and cable entry hole.
    • Drill and plug the fixing holes. Also drill a hole at the cable entry point.
    • Prepare the cable route from the consumer unit to the pull-switch on the ceiling, which must not be located directly over the bath or shower cubicle.
    • Then run the cable from the pull-switch, along the ceiling and down the wall into the back or base of the shower heater, connecting it to the terminal block inside.
    • Feed the cable connecting the switch and heater into the entry hole in the heater.
    • Fix the heater to the wall with fixings supplied following the manufacturers instructions.
    • Prepare the ends of the cable for connecting to the terminals.
    • Complete the plumbing connections.

    Fitting and wiring an electric shower ceiling switch connections.
    Ceiling switch connections.

    Installing the ceiling pull-switch

    You must use a 45 amp double-pole pull-cord switch with a neon indicator light positioned away from the shower or bath.

    • Press out the tab in the back of the pull-switch base and pull the switch cable from the consumer unit through the hole in the base to reach the terminals in the face-plate.
    • Fix the switch base to the ceiling. To fix it to the side of a joist, drill a hole for the cable to fit through to one side of the joist. Drill pilot holes into the joist and screw on the base through these holes.
    • Alternatively fix the base between two joists, drill a hole in the ceiling. Cut a batten to fit between the joists, and drill a hole in the centre of it. Feed the cable through the holes in the batten and through the hole in the ceiling. Fix the batten to the joists with nails hammered at angles into the joists.
    • To attach the pull-cord, separate the body of the switch with the terminals in from the face-plate.
    • Remove the spindle with on/off markings, which completes or breaks the circuit to control the light or appliance.
    • Thread a washer over one end of the cord and tie a knot at the end.
    • Feed the cord into the nylon peg, which sits in the spring.
    • Push the peg into the spring to secure it.
    • Replace the on/off spindle.
    • Screw the body of the switch and face-plate back together again.
    • Connect the supply cable running from the consumer unit to terminals in the switch face-plate marked SUPPLY, FEED, or, IN: the red core to the Live terminal (L); the black core to the Neutral (N) terminal; the yellow-and-green core to the Earth terminal (E).
    • Connect one end of the cable leading to the heater to the second block of terminals in the switch face-plate marked LOAD or OUT: the red core to the Live terminal (L); the black core to the Neutral (N) terminal. Connect the yellow-and-green core to the same Earth terminal (E) that the Earth core from the consumer unit cable is connected to.
    • If the two wires for the neon indicator light are not already connected they should be connected to the Live and Neutral terminals marked LOAD or OUT.
    • Screw the switch face-plate to the mounting box.

    Connections inside the shower heater unit.
    Connections inside the shower heater unit.

    Connecting to the heater

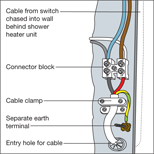
    • To connect the other end of the switch cable to the heater, undo the screws on the cable clamp to feed the cable underneath the clamp.
    • Inside the shower heater unit there will be a connector block. Live and neutral cores will already be connected to one side of the connector block. Connect the cores from the cable to the opposite side of the connector block: the brown core to the Live terminal (L); the blue core to the Neutral (N) terminal. In place of two Earth terminals on the connector block there may be just a single separate Earth terminal (E) to which the yellow-and-green sleeved core should be connected. Should the connector block have a third terminal for the Earth core from the cable, then it must be connected opposite the yellow-and-green core already connected. 
    • Screw the clamp down to secure the cable.

    Completing the circuit at the consumer unit

    • Switch off the power at the consumer unit.
    • Either remove the fuse or turn off the MCB (miniature circuit breaker) you are going to use for the new circuit.
    • With a metal consumer unit knock out the access hole above the MCB you are going to use and fit a rubber grommet. Feed the cable through the hole into the consumer unit.
    • Ensure that you have stripped enough of the cable’s outer sheath for the cores to reach the terminals.
    • Connect the cores to the appropriate terminals. The red core is connected to the terminal at the to top of the fuseway or MCB; the black core is connected to a free terminal on the Neutral terminal block; the yellow-and-green core is connected a free terminal on the Earth terminal block.
    • Fit a 45 amp fuse or a 45 amp MCB. The circuit is now complete and the cover of the consumer unit can be replaced and the power restored.

    Tools needed

    • Insulated screwdriver
    • Trimming knife
    • Wire strippers/cutters
    • Power drill

    Materials needed

    • Cable
    • Grommets
    • Fuse

    How to change/replace an electric shower video

    This video will show you hot to replace an electric shower with a new one.


    Author

    The Editorial Team

    The Editorial Team at lets-do-diy.com are a team of experts led by Mark Wilson. We have been creating DIY projects, articles, costs guides and product reviews since 2008. For more info see our about page.

    Related Projects

    • Fitting a bathroom sink or bidet
    • How to replace a bath
    • How to replace a toilet
    • How to replace and descale a shower head
    • How to replace silicone sealant around a bath or shower

    Recent Comments
    • Vic on Is Christmas a good time for DIY?
    • Anonymous on Average air source heat pump cost (2022)
    • Reggie on Prepare your home for moth season
    Latest News
    0

    Potential DIY home improvement trends for 2023

    1

    Is Christmas a good time for DIY?

    0

    Design trends for 2022 and 2023

    0

    Product Review: Handsaws

    Popular Guides

    Average damp proofing costs

    Average cavity wall insulation cost

    Average garage conversion costs

    Average scaffolding hire costs

    Popular Projects

    Measurements and advice when laying floors

    System boilers

    Fitting and wiring an electric shower

    Applying a self-levelling compound to a concrete floor

    DIY Categories
    Bathroom
    Building, brickwork and masonry
    Ceilings
    Cleaning
    Concrete work
    Damp, rot and infestation
    Drains
    Electrical
    Fireplaces
    Floors
    Garden
    Heating
    Insulation
    Kitchen
    Lighting
    Lofts
    Painting and decorating
    Plasterwork
    Plumbing
    Roof and guttering
    Safety
    Security
    Tiling
    Walls
    Windows
    Woodwork

    Self Build Guide
    How to find a building plot
    Evaluating a building plot (2023)
    How to get a self build mortgage
    Self build construction options
    Self build architect and design considerations (2023)
    Self build planning permission and legal consents
    © 2023 lets do diy ltd | ebuild
    • Home
    • About
    • Contact us

    Type above and press Enter to search. Press Esc to cancel.

    We use cookies on our website to give you the most relevant experience by remembering your preferences and repeat visits. By clicking “Accept All”, you consent to the use of ALL the cookies. However, you may visit "Cookie Settings" to provide a controlled consent.
    Cookie SettingsAccept All
    Manage consent

    Privacy Overview

    This website uses cookies to improve your experience while you navigate through the website. Out of these, the cookies that are categorized as necessary are stored on your browser as they are essential for the working of basic functionalities of the website. We also use third-party cookies that help us analyze and understand how you use this website. These cookies will be stored in your browser only with your consent. You also have the option to opt-out of these cookies. But opting out of some of these cookies may affect your browsing experience.
    Necessary
    Always Enabled
    Necessary cookies are absolutely essential for the website to function properly. These cookies ensure basic functionalities and security features of the website, anonymously.
    CookieDurationDescription
    cookielawinfo-checkbox-analytics11 monthsThis cookie is set by GDPR Cookie Consent plugin. The cookie is used to store the user consent for the cookies in the category "Analytics".
    cookielawinfo-checkbox-functional11 monthsThe cookie is set by GDPR cookie consent to record the user consent for the cookies in the category "Functional".
    cookielawinfo-checkbox-necessary11 monthsThis cookie is set by GDPR Cookie Consent plugin. The cookies is used to store the user consent for the cookies in the category "Necessary".
    cookielawinfo-checkbox-others11 monthsThis cookie is set by GDPR Cookie Consent plugin. The cookie is used to store the user consent for the cookies in the category "Other.
    cookielawinfo-checkbox-performance11 monthsThis cookie is set by GDPR Cookie Consent plugin. The cookie is used to store the user consent for the cookies in the category "Performance".
    viewed_cookie_policy11 monthsThe cookie is set by the GDPR Cookie Consent plugin and is used to store whether or not user has consented to the use of cookies. It does not store any personal data.
    Functional
    Functional cookies help to perform certain functionalities like sharing the content of the website on social media platforms, collect feedbacks, and other third-party features.
    Performance
    Performance cookies are used to understand and analyze the key performance indexes of the website which helps in delivering a better user experience for the visitors.
    Analytics
    Analytical cookies are used to understand how visitors interact with the website. These cookies help provide information on metrics the number of visitors, bounce rate, traffic source, etc.
    Advertisement
    Advertisement cookies are used to provide visitors with relevant ads and marketing campaigns. These cookies track visitors across websites and collect information to provide customized ads.
    Others
    Other uncategorized cookies are those that are being analyzed and have not been classified into a category as yet.
    SAVE & ACCEPT