• Home
  • DIY
    • Self build
    • Projects and advice
      • Bathroom
      • Building, brickwork and masonry
      • Ceilings
      • Cleaning
      • Concrete work
      • Damp, rot and infestation
      • Drains
      • Electrical
      • Fireplaces
      • Floors
      • Garden
      • Heating
      • Insulation
      • Kitchen
      • Lighting
      • Lofts
      • Painting and decorating
      • Plasterwork
      • Plumbing
      • Roof and guttering
      • Safety
      • Security
      • Tiling
      • Walls
      • Windows
      • Woodwork
    • Glossary
    • Know your tools
    • Know your materials
  • Cost guides
    • DIY & self build
    • Pets
    • Health & wellbeing
    • Home & garden
  • News
  • Community
Facebook Twitter Instagram
lets-do-diy.com
  • Home
  • DIY
    • Self build
    • Projects and advice
      • Bathroom
      • Building, brickwork and masonry
      • Ceilings
      • Cleaning
      • Concrete work
      • Damp, rot and infestation
      • Drains
      • Electrical
      • Fireplaces
      • Floors
      • Garden
      • Heating
      • Insulation
      • Kitchen
      • Lighting
      • Lofts
      • Painting and decorating
      • Plasterwork
      • Plumbing
      • Roof and guttering
      • Safety
      • Security
      • Tiling
      • Walls
      • Windows
      • Woodwork
    • Glossary
    • Know your tools
    • Know your materials
  • Cost guides
    • DIY & self build
    • Pets
    • Health & wellbeing
    • Home & garden
  • News
  • Community
lets-do-diy.com
You are at:Home»Projects and advice»how to lay carpet underlay

how to lay carpet underlay

Summary: Learn how to lay carpet underlay, fit gripper rods, and install the underlay padding.


Fit gripper rods around the room, making sure the teeth are pointing towards the wall.
Cut and fit metal threshold strips on every doorway.
Fix the underlay to the floor with a staple gun or floor tacks. Use double-sided tape for concrete floors.

Laying the carpet underlay

A carpet underlay has many useful properties which make it a common instalment underneath carpets. Although not all carpets require an underlay, it is important to have one for the carpets that do. An underlay will reduce carpet wear by acting as a cushion, which slows down the flattening of the pile. It also offers excellent heat and sound insulation. If you have under floor heating, it is recommended that you install a carpet underlay that has a good thermal conductivity rating.

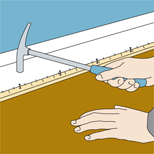
  • You will need to lay gripper rods around the perimeter of the room you are carpeting with the gripper teeth pointing towards the wall. There should be a gap between the rods and the wall of about the thickness of the carpet you will be laying. When nailing the rods to the floor use a carpet layers hammer or a claw hammer. These are narrow hammers that help you to avoid hitting the teeth on the rods. Use masonry nails or suitable adhesive if the floor surface is concrete.
  • When you come across a corner in the room, cut the rods to size using a junior hacksaw and butt the rods up against each other.
  • If you have a curved wall, you will need to cut the rods into smaller pieces to follow the curve as accurately as possible.
  • Now you need to fix a threshold strip in the entrance to the doorway. This is a metal strip with teeth that holds the carpet down.
  • Now you are ready to fit the underlay. Roll out a couple of metres and position it so it’s up against the top end wall and side of the room. Butt the underlay up against the gripper rods (not on top of the gripper rods).
  • When fixing the underlay to the floor you can either staple it or nail it using tacks; on concrete floors use double sided tape.
  • Continue to unroll the underlay, keeping it up against the gripper rods. Smooth it out so it stays flat and fix in position. Any pipes that need cutting around or excess underlay that needs to be cut to size can be done so using a utility knife.


Tools needed

  • Staple gun
  • Trimming knife OR craft knife

Materials needed

  • Paper underlay
  • Double-sided carpet tape

Carpet underlay installation video

Summary: DIY video showing you how to lay carpet underlay.

Not all carpets require an underlay but it is often recommended that you fit one because a carpet underlay can not only make your carpet feel softer and slow down the flattening of the pile, but it is also very good for heat and sound insulation.


Related projects

  • Applying a self-levelling compound to a concrete floor
  • Average carpet installation cost
  • Average floor tiling costs
  • Average hardwood floor cost
  • Average laminate floor cost
  • Carpet laying
  • Filling gaps in floorboards
  • Floor maintenance
  • How to carpet stairs

Recent Comments
  • Ted on Product Review: Erbauer ERO400 125mm electric random orbital sander
  • Vic on Is Christmas a good time for DIY?
  • Anonymous on Average air source heat pump cost (2022)
  • Reggie on Prepare your home for moth season
Latest News
1

Product Review: Erbauer ERO400 125mm electric random orbital sander

0

Product Review: DeWalt DCF787 brushless cordless impact driver

0

The UK’s ambitious drive towards energy efficiency – Exploring the pros and cons of heat pump systems

0

Potential DIY home improvement trends for 2023

Popular Guides

Average damp proofing costs

Average garage conversion costs

Average cost of a conservatory

Average cost to hire a cherry picker

Popular Projects

Drilling through steel or metal

Clearing an air lock in a bathroom tap

Painting doors and door frames

Changing water heater element

DIY Categories
Bathroom
Building, brickwork and masonry
Ceilings
Cleaning
Concrete work
Damp, rot and infestation
Drains
Electrical
Fireplaces
Floors
Garden
Heating
Insulation
Kitchen
Lighting
Lofts
Painting and decorating
Plasterwork
Plumbing
Roof and guttering
Safety
Security
Tiling
Walls
Windows
Woodwork

Self Build Guide
How to find a building plot
Evaluating a building plot (2023)
How to get a self build mortgage
Self build construction options
Self build architect and design considerations (2023)
Self build planning permission and legal consents
© 2023 lets do diy ltd | ebuild | Partner site:talkcosts.co.uk
  • Home
  • About
  • Contact us

Type above and press Enter to search. Press Esc to cancel.