
LAST UPDATED: 11th January 2023 by The Editorial Team
Summary: Step by step guide and video showing how to replace a socket, replace a damaged face-plate, replace a damaged surface-mounted socket, replace a single socket with a double socket, install a flush-mounted box and fit a surface-mounted box.
Contents
How to replace a plug socket
A damaged socket can be potentially dangerous and must be replaced as soon as possible. When buying a replacement socket face-plate, check that you have the correct type for a surface-mounted or flush-mounted socket, and that the screw holes will align with those on the mounting box.
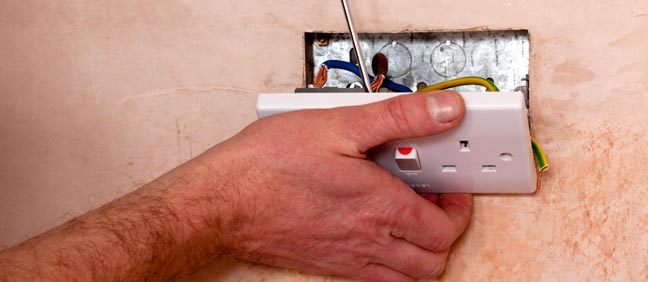
Replacing a damaged face-plate
- Cut off the power supply at the consumer unit and switch off the MCB (miniature circuit breaker) to the circuit supplying the damaged socket. To check that the socket is dead, plug in a lamp and switch it on.
- Unscrew the face-plate, and pull it gently away from the wall. It is a good idea to keep the old screws, as the screws supplied with the new face-plate may not fit the lugs in the mounting box.
- Make a note of how many cores are connected to each terminal. Depending on whether the socket is on a fused spur, the ring main circuit or supplying another socket on a spur, there could be one, two or three cores connected to the terminals. Make a note of the terminals that the cores are connected to, as they have to be reconnected in the same way.
- Release the cores and remove the damaged face-plate.
- Connect the cores to the terminals on the new face-plate: the red core/s to the Live terminal (L); the black core/s to the Neutral terminal (N); the yellow-and-green core/s to the Earth terminal (E).
- Carefully fold the cores into the mounting box and screw the face-plate to the mounting box.
- Turn the power supply back on and switch the MCB back on and test that the socket is working by plugging in a lamp and switching it on. If the socket is not working, turn off the mains supply and tighten the connections at the terminals.
Replacing a damaged surface-mounted socket
To replace a damaged surface-mounted socket follow the instructions above but after disconnecting the cores from the terminals on the faceplate, unscrew the screws holding the mounting box to the wall and remove it.
- Feed the cable/s through the hole/s at the rear of the new mounting box and screw it to the wall.
- Connect the cores to the terminals on the new faceplate as described above and screw the face-plate to the mounting box.
Replacing a single socket with a double socket
A surface-mounted single socket can be replaced with a double socket unit. A flush mounted single socket can have a surface-mounted plastic box called a pattress fitted over the existing socket. Alternatively, the single socket mounting box can be removed, the housing enlarged and a double-socket mounting box fitted.
Flush-mounted sockets are not only neater, they are less likely to be damaged when furniture is moved.
- Cut off the power supply at the consumer unit and switch off the MCB (miniature circuit breaker) to the circuit supplying the damaged socket. To check that the socket is dead, plug in a lamp and switch it on.
- Unscrew the socket face-plate, and pull it gently away from the wall.
- Disconnect the cores from the terminals and discard the face-plate.
Flush-mounted boxes
- Unscrew the screws holding the mounting box in its housing and remove it.
- To make the hole bigger to accommodate the double-socket mounting box, hold the new mounting box in position (it will cover the existing housing) and mark its outline on the wall.
- If fitting the socket to a masonry wall, drill a series of holes using a masonry bit around the outline of the socket. The holes should be the same depth as the new mounting box. This can be gauged by winding a piece of adhesive tape around the drill bit at the required depth.
- Having drilled the holes around the outline, drill more holes within it. Using a club hammer and bolster remove the masonry to the required depth. Remove the dust from the housing.
- If the new double socket is situated on a plasterboard wall, once again mark the outline of the mounting box on the wall. Then extend the size of the existing hole by cutting along the lines using a padsaw. By drilling holes at the corners to accommodate the saw blade you will achieve neat corners.
- Remove the discs from the pre-cut holes in the back of the mounting box. Fit a grommet into the cable hole to prevent the edges chafing the cable. Feed the cable through the hole.
- Screw the mounting box securely into the housing.
- Connect the cores to the terminals on the new face-plate: the red core/s to the Live terminal (L); the black core/s to the Neutral terminal (N); the yellow-and-green core/s to the Earth terminal (E).
- If you have a metal mounting box fit a flying earth between the earth terminal on the face-plate and the earth terminal in mounting box. A flying earth is easily made using an off cut of cable sheathed in yellow-and-green plastic sleeving.
- Carefully fold the cores into the mounting box, replace the socket face-plate and screw it into place.
- Turn on the power supply and switch on the MCB. Check both sockets are working by plugging in an appliance, such as a lamp, and switching it on.
Surface-mounted boxes
- If fitting a surface-mounted double socket first remove the old single socket mounting box from the wall.
- Position the new mounting box against the wall and use a spirit level to check that it is level.
- With a bradawl make small holes in the wall at the fixing points.
- Drill the holes and insert wall plugs.
- Feed the cable through the hole in the back of the mounting box and screw it to the wall.
- Connect the cores to the terminals on the face-plate as described above.
- Carefully fold the cores into the mounting box and screw the face-plate in position.
- Restore the mains power supply and switch on the MCB. Check both sockets are working by plugging in an appliance, such as a lamp, and switching it on.
Tools Needed
- Insulated screwdriver
- Power drill
- Masonry bit
- Brick bolster
- Club hammer
- Padsaw (For plasterboard walls)
- Spirit level
- Bradawl
Materials needed
- Flush-mounted socket OR surface-mounted socket OR double socket OR new faceplate
- Grommets
- Yellow-and- green sheathing
Important note
The colour-coding system for electric cable changed in 2006, make sure you read Electric cable and flex to view the new information.
Replace a plug socket faceplate video
Author
Related projects
- Converting a single socket outlet to a double socket
- Installing an outdoor socket
- Installing two-way switches
- Repairing a pull-cord switch
- Wiring a dimmer switch